
Crafting
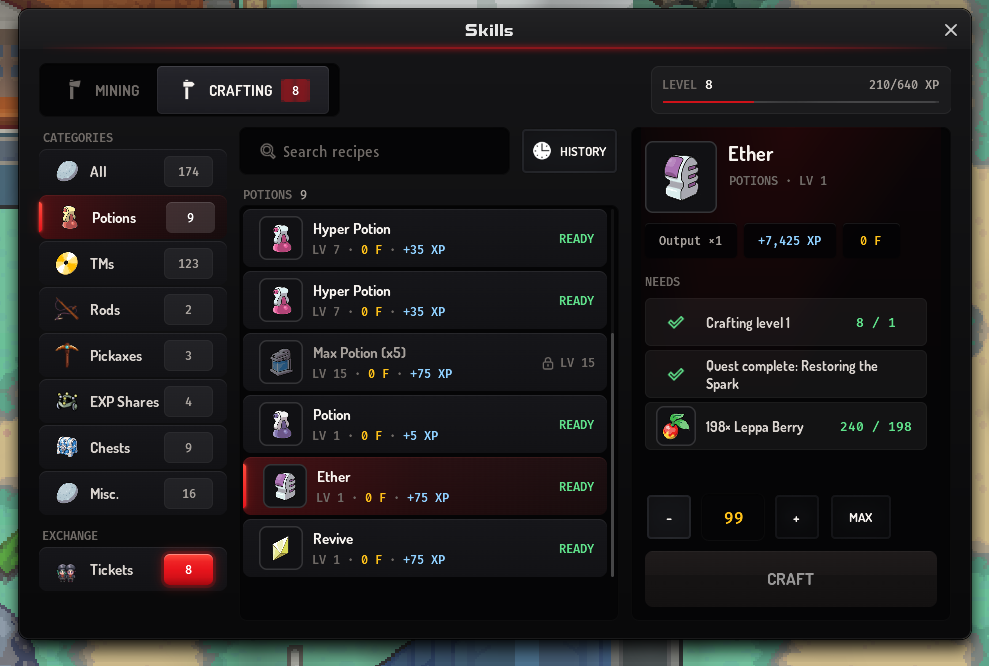
Crafting turns materials you collect into potions, TMs, rods, pickaxes, EXP Shares and Pokémon chests. It has its own level, from 1 to 30: every craft gives crafting XP, and higher-level recipes give more.

Unlock crafting
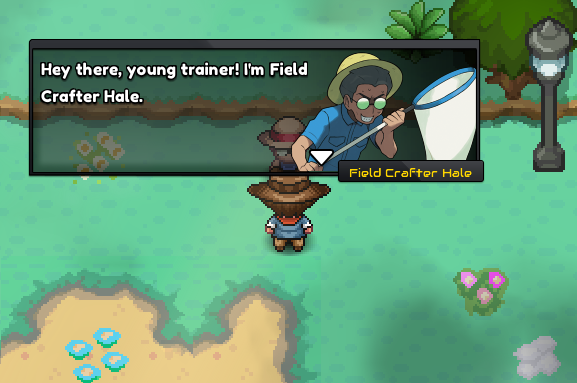
Section titled “Unlock crafting”Crafting unlocks when you meet Field Crafter Hale on Route 201 in Sinnoh, west of Sandgem Town.
-
Talk to Hale. He asks for two Oran Berries (
 Oran Berryx2), which wild
 Bidoof in the grass can drop.
-
Bring him the berries. This unlocks your first recipe, the
 Potion.
-
Craft the Potion. Open Skills in the top-right panel and press Crafting at the top. Pick the Potion and press Craft.
-
Talk to Hale again. As a starter bonus he gives you 5 Potions and sends you to Route 202.
More crafting teachers
Section titled “More crafting teachers”Hale’s friends along your Sinnoh journey each unlock more healing recipes when you meet them. Most want to see an item in your bag first. They don’t take it; you craft with it:
| Teacher | Where | Bring | Unlocks |
|---|---|---|---|
| Field Crafter Hale | Route 201 | Oran Berryx2, dropped by wild Bidoof |
Potion |
| Supply Medic Mira | Route 202 |  Leppa Berryx2, dropped by wild  Kakuna and  Metapod |
 Ether |
| Senior Alchemist Corvin | Route 203 |  Honeyx1, dropped by wild  Combee |
 Revive |
| Apothecary Brewer Tamsin | Route 208 | Potionx3, which you can craft |
 Super Potion |
| Coastal Mixmaster Rellan | Route 213: East | Nothing |  Hyper Potion |
| Senior Restorative Alchemist Sova | Acuity Lakefront |  Big Bamboo Shootx1, a mining reward |
 Max Potion |
| Nectar Crafter | Veilstone Research House | See below |  Pure Nectar |
These teachers are side quests: you can skip them and the story carries on.
The Nectar Crafter only teaches you once you have finished Hale’s tutorial and the Horde Researcher’s field study next to him. See Co-op and hordes.
Where to find the other teachers:


The Crafting screen
Section titled “The Crafting screen”Open Skills in the top-right panel and press Crafting at the top of the window. Skills holds two skills, Mining and Crafting, each with your level next to its name. Next to them you see your crafting level and your XP towards the next level, on a red bar.
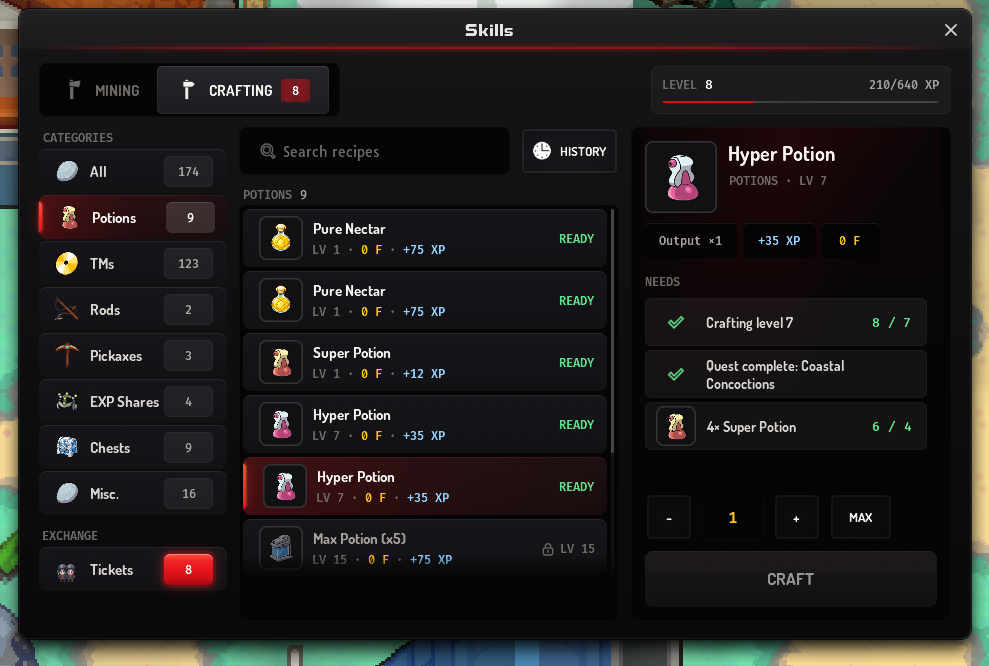
| Part | What it shows |
|---|---|
| Categories (left) | All, Potions, TMs, Rods, Pickaxes, EXP Shares, Chests and Misc., each with how many recipes it holds |
| Recipe list (middle) | A search box, the History button and every recipe in the category. Search finds a recipe by its name or by an ingredient’s name. |
| Recipe (right) | The recipe you picked: what it makes, its Needs list, the amount and the Craft button |
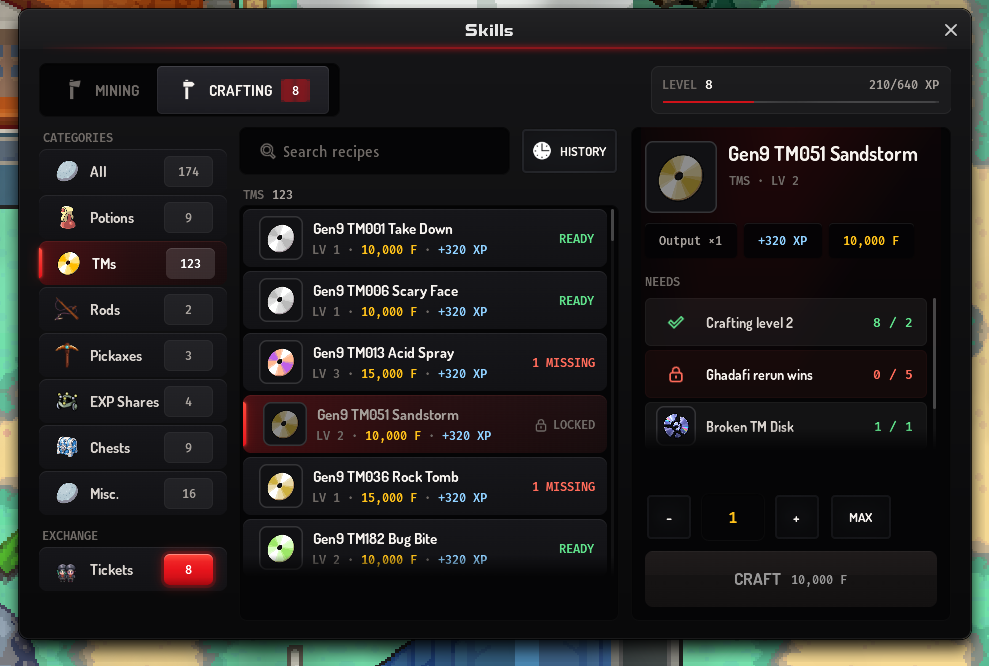
Each recipe row shows its crafting level, its cost and the crafting XP it gives. On the right, its status says whether you can make it:
- Ready: you can craft it now.
- 1 missing, 2 missing and so on: you lack that many of its ingredients, or the money.
- A lock with Lv 25 or Mining 60: your crafting or mining level is too low.
- A lock with Locked: another requirement is not met yet, such as a quest or a boss win.
A recipe you have just unlocked is marked NEW until you look at it. The Skills button glows when you unlock new recipes, and then opens straight on Crafting.
Making a recipe
Section titled “Making a recipe”-
Pick the recipe. Its Needs list shows everything it takes, each with what you have and what you need: your crafting level, any other requirement, the money if you can’t pay it, and each ingredient. Lines you don’t meet are red.
-
Set the amount. Use the − and + buttons (hold one to count faster), type a number, or press Max for as many as you can make. You can craft up to 99 at once, and the Needs list counts for the amount you set.
-
Press Craft. The button shows the total cost. On a computer the recipe also shows the total crafting XP. Every ingredient is used up, including blueprints and the old rod a better rod is made from.
Recipe requirements
Section titled “Recipe requirements”Besides your crafting level, a recipe can ask for:
- Fishing or mining level: rods need a fishing level, pickaxes a mining level.
- A quest or a boss win: for example “Defeat Boss Azelf on Azelf Cavern” or beating one of Sinnoh’s Elite Four. Once you have beaten the boss, the recipe stays unlocked.
- Rerun wins: winning the repeatable rematch (rerun) of a Jvaloh boss such as a Gym Leader a number of times, for example 5 Ghadafi rerun wins. Its line in Needs shows your progress, such as 2 / 5.
Until you meet them, the recipe’s row shows a lock, and the requirement’s line in Needs is red.
Crafting History
Section titled “Crafting History”History (a clock on a phone) opens Crafting History: your all-time totals (money spent, items crafted, total crafts and XP earned), what you craft and use most, and every craft you have made, page by page. Tap a craft to see what it used. Share to Chat posts your totals in chat.
Costume tickets
Section titled “Costume tickets”While you hold a costume bundle ticket from a Casino chest, a Tickets category appears under Exchange, last on the list. Pick the costume you want, for example the male or the female version, and press Exchange. The category goes away once you have no ticket left.
On a phone
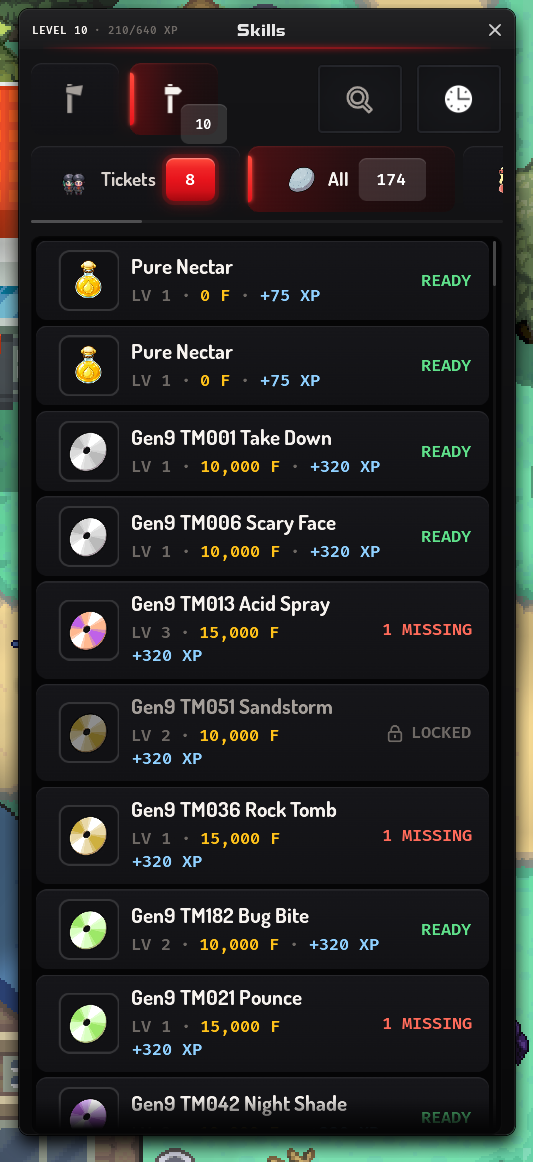
Section titled “On a phone”On a phone the same parts are rearranged to fit:
- Sideways: a column of buttons down the left holds Mining, Crafting, search and History. The categories become a row you scroll sideways, with Tickets first while you hold one. The recipe list and the recipe sit side by side, and your level and XP move up next to the window’s title.
- Upright: those four buttons sit in a row at the top, and the recipe list fills the window. Tap a recipe to open it, and the back arrow takes you back to the list.
Where to find ingredients
Section titled “Where to find ingredients”Most ingredients are ordinary items. These are the ones players ask about most:
| Ingredient | Where to get it |
|---|---|
| Oran Berry |
Wild Bidoof can drop it |
| Honey |
Wild Combee can drop it |
| Leppa Berry |
Wild Kakuna and Metapod can drop it |
| Big Bamboo Shoot |
A mining reward. Mining starts in Hoenn, so until then you can only buy one from another player, for example at the Trade House |
 Fairy Feather |
Wild  Marill,  Azumarill,  Cutiefly,  Tinkatink,  Ralts,  Kirlia and  Mime Jr. can drop it |
 Broken TM Disk |
Daycare Token Shop in each Daycare (45 Daycare Tokens); see Daycare |
| Exp Share blueprints | Daycare Token Shop (500 Daycare Tokens each) |
| Mythic and Aether Rod Blueprint | The Master Fisherman; see Fishing |
| Gold, Platinum and Diamond Pickaxe Blueprint | The Blueprint Guru; see Mining |
| Fossil parts (Fossilized Carapace, Petalized Coral and others) | Fossil Pokémon from fossil chests; see Mining |
 Fossilized Fish |
Mining and Origin Ore rewards |
 Dratini Scale |
Fishing treasure chests; the  Dratini from the Fishing Competition or a  Dratini Chest can drop it |
 Abyssal Pearl |
Wild Pokémon, treasure chests and Pirate Jack in the Abandoned Ships; fishing treasure chests. See Diving |
| Will, Emotion and Knowledge Core | The  Azelf,  Mesprit and  Uxie bosses in the Legendary Caverns |
| Ice, Rock and Steel Core | The  Regice,  Regirock and  Registeel bosses in Hoenn; see Sage Eron and the Regis |
 Dragon Core |
The  Regidrago boss in the Fennel Ruins (Kanto) |
 Prismatic Core, Moon Core |
Legendary mining rewards (Moon Core from Dark ore only) |
 Sun Core |
Legendary Origin Ore reward |
For other wild drops, see Wild drops or the Pokémon locations pages, which list what each Pokémon can drop.
Levelling Crafting fast
Section titled “Levelling Crafting fast”Each craft gives the crafting XP shown in its recipe row, times the amount you make. A batch gives the same XP as crafting one at a time, so set a high amount, or press Max, and craft them all at once. The top of the window shows your XP towards the next level.
The climb gets steep: level 1 to 2 takes 320 XP, but level 29 to 30 takes 44,308 XP. Reaching level 30 takes 409,624 XP in all.
Potions and Ethers give cheap, steady XP that you can repeat as often as you like. TMs give far more XP per craft, but each costs money and a Broken TM Disk. These give the most XP for their cost, listed by the crafting level that unlocks them:
| From crafting level | Craft | XP each | You need |
|---|---|---|---|
| 1 | Ether |
75 | Leppa Berryx2 |
| 1 | Super Potion |
12 | Potionx3 |
| 3 | TM226 Dragon Cheer | 565 | 7,000 F, Broken TM Disk,  Dragon Fang,  Heart Scale |
| 7 | Hyper Potion |
35 | Super Potionx4 |
| 7 | TM128 Amnesia | 565 | 7,000 F, Broken TM Disk,  Twisted Spoon |
| 12 | TM075 Light Screen | 678 | 7,000 F, TM128 Amnesia, Twisted Spoon |
| 14 | TM133 Earth Power | 200 | 10 TM005 Mud-Slap or 10 TM028 Bulldoze |
The Ether, Super Potion and Hyper Potion recipes unlock when you meet their crafting teachers. TM075 Light Screen is made from a TM128 Amnesia, so it adds 678 XP without using up another Broken TM Disk.
Where the ingredients come from:
- Potions: any Poké Mart sells them for 50 F each.
- Leppa Berries and Broken TM Disks: see where to find ingredients.
- Dragon Fang: wild
 Gible drop it, and the Daycare Token Shop sells it for 75 Daycare Tokens.
- Twisted Spoon and Heart Scale: wild
 Kadabra and
 Abra drop Twisted Spoons, and wild
 Luvdisc drop Heart Scales. See Wild drops.
- TM005 and TM028: both are mining rewards.
Crafts you only make once also pay well: a pickaxe gives 1,388–2,588 XP, a rod 1,988–2,588 XP and a crafted Exp Share 848–1,988 XP.
All recipes
Section titled “All recipes”These tables list every recipe currently in the game, generated from the game’s recipe data.
Potions
Section titled “Potions”| Recipe | Crafting level | Cost | Ingredients | Also needs |
|---|---|---|---|---|
| Ether | 1 | – | Leppa Berryx2 | Meet Supply Medic Mira on Route 202 |
| Potion | 1 | – | Oran Berryx2 | Meet Field Crafter Hale on Route 201 |
| Pure Nectar | 1 | – |  IV Potionx1, Honeyx3 | Learn Pure Nectar crafting at the Veilstone Research House |
| Pure Nectar | 1 | – | IV Potionx1, Leppa Berryx3 | Learn Pure Nectar crafting at the Veilstone Research House |
| Revive | 1 | – | Honeyx1, Oran Berryx2, Leppa Berryx2 | Meet Senior Alchemist Corvin on Route 203 |
| Super Potion | 1 | – | Potionx3 | Meet Apothecary Brewer Tamsin on Route 208 |
| Hyper Potion | 7 | – |  Soda Popx4 | Meet Coastal Mixmaster Rellan on Route 213 |
| Hyper Potion | 7 | – | Super Potionx4 | Meet Coastal Mixmaster Rellan on Route 213 |
| Max Potionx5 | 15 | – | Hyper Potionx5, Big Bamboo Shootx1 | Meet Senior Restorative Alchemist Sova at Acuity Lakefront |
Chests
Section titled “Chests”Crafted chests spawn a Pokémon encounter when you open them, so carry a Pokémon that can battle.
| Recipe | Crafting level | Cost | Ingredients | Also needs |
|---|---|---|---|---|
| Dratini Chest | 5 | 35,000 F | Dratini Scalex1, Dragon Fangx1,  Mystic Waterx1 | – |
 Azelf Box | 10 | 10,000 F |  Will Corex1,  Ability Capsulex1,  PP Upx1,  Mind Platex1 | – |
 Mesprit Box | 10 | 10,000 F |  Emotion Corex1,  Pearl Stringx1,  Star Piecex1, Twisted Spoonx1 | – |
 Uxie Box | 10 | 10,000 F |  Knowledge Corex1, Mind Platex1,  Wise Glassesx1, Star Piecex1 | – |
 Regice Chest | 15 | 20,000 F |  Ice Corex1,  Icicle Platex1,  Never-Melt Icex1, Star Piecex1 | – |
 Regidrago Chest | 15 | 50,000 F | Dragon Corex1,  Draco Platex1, Dragon Fangx1, Star Piecex1 | – |
 Regirock Chest | 15 | 20,000 F |  Rock Corex1,  Stone Platex1,  Hard Stonex1,  Rare Bonex1 | – |
 Registeel Chest | 15 | 20,000 F |  Steel Corex1,  Iron Platex1,  Metal Coatx1 | – |
 Necrozma Chest | 20 | 100,000 F | Prismatic Corex1, Metal Coatx2, Rare Bonex1, Star Piecex1 | – |
| Recipe | Crafting level | Cost | Ingredients | Also needs |
|---|---|---|---|---|
 Mythic Rod | 15 | – |  Mythic Rod Blueprintx1,  Super Rodx1,  King's Rockx1,  Pearlx5,  Big Pearlx2, Heart Scalex25, Icicle Platex25 | Fishing level 100 |
 Aether Rod | 22 | – |  Aether Rod Blueprintx1, Mythic Rodx1, Dratini Scalex1, Pearl Stringx2, Abyssal Pearlx10, Heart Scalex40,  Splash Platex25 | Fishing level 125 |
Pickaxes
Section titled “Pickaxes”| Recipe | Crafting level | Cost | Ingredients | Also needs |
|---|---|---|---|---|
 Diamond Pickaxe | 1 | – |  Diamond Pickaxe Blueprintx1, Heart Scalex40,  Comet Shardx1, Pearl Stringx1,  Oceanic Fossil Residuex1,  Spiral Shell Fragmentx1,  Reptilian Fangx1,  Rampaging Jawbonex1 | Mining level 60 |
 Gold Pickaxe | 1 | – |  Gold Pickaxe Blueprintx1, Heart Scalex10,  Nuggetx1, Pearlx1, Fossilized Carapacex1,  Petalized Coralx1,  Shell Plate Fragmentx1 | Mining level 20 |
 Platinum Pickaxe | 1 | – |  Platinum Pickaxe Blueprintx1, Heart Scalex25, Big Pearlx5,  Fossilized Crestx1,  Ancient Wing Fragmentx1, Glacial Crest Shardx1, Fossilized Fishx1 | Mining level 40 |
EXP Shares
Section titled “EXP Shares”| Recipe | Crafting level | Cost | Ingredients | Also needs |
|---|---|---|---|---|
 Soothe Share | 12 | – | Heart Scalex10,  Soothe Bellx1,  Soothe Share Blueprintx1 | – |
 Everstone Exp Share | 14 | – |  Everstonex1,  Binding Bandx1,  Everstone Exp Share Blueprintx1 | – |
 Macho Brace Exp Share | 14 | – |  Lagging Tailx1,  Macho Bracex1,  Macho Brace Exp Share Blueprintx1 | – |
 Move-Block Exp Share | 16 | – |  Spell Tagx1, Broken TM Diskx1,  Move-Block Exp Share Blueprintx1 | – |
Bait, IV Toxin, Meteorites and the parts for the N-Solarizer and N-Lunarizer.
| Recipe | Crafting level | Cost | Ingredients | Also needs |
|---|---|---|---|---|
 Galarian Moltres Wings | 1 | – | Galarian Moltres Wings Ticketx1 | – |
 Gomu Gomu no Mi Devil Fruit Backpack | 1 | – | Gomu Gomu no Mi Devil Fruit Backpack Ticket (Luffy)x1 | – |
 Marco Phoenix Wings | 1 | – | Marco Phoenix Wings Ticketx1 | – |
 Mera Mera no Mi Devil Fruit Backpack | 1 | – | Mera Mera no Mi Devil Fruit Backpack Ticket (Sabo)x1 | – |
 Sogeking Mask | 1 | – | Sogeking Mask Ticketx1 | – |
 Enhanced Bait | 6 | – |  Stardustx1,  Lurex1, Pearlx1,  Sitrus Berryx5,  Lum Berryx5 | – |
 IV Toxin | 8 | – |  Pomeg Berryx2,  Kelpsy Berryx2,  Qualot Berryx2,  Hondew Berryx2,  Grepa Berryx2,  Tamato Berryx2 | – |
| Enhanced Baitx3 | 14 | – |  Big Nuggetx1, Star Piecex1, Pearl Stringx1, Lurex1, Sitrus Berryx5, Lum Berryx5 | – |
 Meteorite Base | 22 | – | Stardustx4, Comet Shardx2 | – |
 Guard Meteorite (Defense) | 23 | 60,000 F | Meteorite Basex1, Star Piecex1, Stardustx4 | – |
 Meteorite Core (Normal) | 23 | 30,000 F | Meteorite Basex1, Star Piecex1 | – |
 Swift Meteorite (Speed) | 25 | 60,000 F | Meteorite Basex1, Comet Shardx3, Everstonex1 | – |
 Assault Meteorite (Attack) | 26 | 60,000 F | Meteorite Basex1, Star Piecex3, Everstonex2 | – |
 Prism Casing | 28 | – | Comet Shardx5, Stardustx2, Everstonex2 | – |
 N-Lunarizer | 30 | 75,000 F | Prism Casingx1, Moon Corex1, Comet Shardx4, Star Piecex2 | – |
 N-Solarizer | 30 | 75,000 F | Prism Casingx1, Sun Corex1, Star Piecex4 | – |
Almost every TM recipe starts from a Broken TM Disk. Many also need a type-themed item, and the strongest ones need a boss win or rerun wins. There are 123 TM recipes.
Show all TM recipes
| TM | Crafting level | Cost | Ingredients | Also needs |
|---|---|---|---|---|
 Gen9 TM001 (Take Down) | 1 | 10,000 F | Broken TM Diskx1 | – |
 Gen9 TM002 (Charm) | 1 | 10,000 F | Broken TM Diskx1, Fairy Featherx1 | – |
 Gen9 TM003 (Fake Tears) | 1 | 10,000 F | Broken TM Diskx1 | – |
 Gen9 TM006 (Scary Face) | 1 | 10,000 F | Broken TM Diskx1 | – |
 Gen9 TM011 (Water Pulse) | 1 | 5,000 F | Broken TM Diskx1, Splash Platex1, Fossilized Fishx1 | – |
 Gen9 TM012 (Low Kick) | 9 | 25,000 F | Broken TM Diskx1,  Proteinx1,  Muscle Bandx1 | – |
 Gen9 TM013 (Acid Spray) | 3 | 15,000 F | Broken TM Diskx1 | – |
 Gen9 TM018 (Thief) | 4 | 15,000 F | Broken TM Diskx1,  Black Glassesx2 | – |
 Gen9 TM019 (Disarming Voice) | 2 | 15,000 F | Broken TM Diskx1, Fairy Featherx1 | – |
 Gen9 TM021 (Pounce) | 1 | 15,000 F | Broken TM Diskx1,  Silver Powderx1 | – |
 Gen9 TM022 (Chilling Water) | 1 | 5,000 F | Broken TM Diskx1, Splash Platex1, Never-Melt Icex1 | – |
 Gen9 TM024 (Fire Spin) | 1 | 15,000 F | Broken TM Diskx1,  Charcoalx1 | – |
 Gen9 TM027 (Aerial Ace) | 17 | 35,000 F | Broken TM Diskx1,  Sharp Beakx2 | – |
 Gen9 TM031 (Metal Claw) | 1 | 10,000 F | Broken TM Diskx1 | – |
 Gen9 TM032 (Swift) | 3 | 20,000 F | Broken TM Diskx1,  Silk Scarfx1 | – |
 Gen9 TM033 (Magical Leaf) | 1 | 10,000 F | Broken TM Diskx1,  Miracle Seedx1 | – |
 Gen9 TM034 (Icy Wind) | 4 | 20,000 F | Broken TM Diskx1, Never-Melt Icex1 | Thanda rerun wins (5) |
 Gen9 TM036 (Rock Tomb) | 1 | 15,000 F | Broken TM Diskx1,  Smooth Rockx1 | – |
 Gen9 TM038 (Flame Charge) | 2 | 15,000 F | Broken TM Diskx1, Charcoalx1 | – |
 Gen9 TM039 (Low Sweep) | 3 | 20,000 F | Broken TM Diskx1, Proteinx1 | – |
 Gen9 TM042 (Night Shade) | 2 | 10,000 F | Broken TM Diskx1 | – |
 Gen9 TM044 (Dragon Tail) | 5 | 7,000 F | Broken TM Diskx1, Dragon Fangx1, Heart Scalex1,  HP Upx1 | – |
 Gen9 TM046 (Avalanche) | 17 | 35,000 F | Broken TM Diskx1, Never-Melt Icex2, Icicle Platex1,  Ice Stonex1 | – |
 Gen9 TM048 (Volt Switch) | 8 | 20,000 F | Broken TM Diskx1,  Magnetx1 | – |
 Gen9 TM049 (Sunny Day) | 2 | 10,000 F | Broken TM Diskx1 | Blitz rerun wins (10) |
 Gen9 TM050 (Rain Dance) | 3 | 5,000 F | Broken TM Diskx1,  Damp Rockx1, Splash Platex1 | Izumi rerun wins (5) |
 Gen9 TM051 (Sandstorm) | 2 | 10,000 F | Broken TM Diskx1, Hard Stonex1 | Ghadafi rerun wins (5) |
 Gen9 TM052 (Snowscape) | 2 | 10,000 F | Broken TM Diskx1, Never-Melt Icex1 | Thanda rerun wins (10) |
 Gen9 TM053 (Smart Strike) | 2 | 15,000 F | Broken TM Diskx1, Metal Coatx1 | Complete quest: Defeat Boss Registeel on Ironheart Cavern |
 Gen9 TM056 (Bullet Seed) | 4 | 15,000 F | Broken TM Diskx1, Miracle Seedx1 | – |
 Gen9 TM059 (Zen Headbutt) | 1 | 10,000 F | Broken TM Diskx1, Twisted Spoonx1 | Complete quest: Defeat Boss Azelf on Azelf Cavern |
 Gen9 TM060 (U-turn) | 18 | 35,000 F | Broken TM Diskx1, Silver Powderx2 | Complete quest: Defeat Aaron in Sinnoh's Elite 4 |
 Gen9 TM061 (Shadow Claw) | 9 | 25,000 F | Broken TM Diskx1, Spell Tagx1 | – |
 Gen9 TM063 (Psychic Fangs) | 6 | 10,000 F | Broken TM Diskx1, Twisted Spoonx1 | – |
 Gen9 TM070 (Sleep Talk) | 12 | 25,000 F | Broken TM Diskx1, Silk Scarfx2 | – |
 Gen9 TM072 (Electro Ball) | 9 | 25,000 F | Broken TM Diskx1, Magnetx1 | Elleak rerun wins (10) |
 Gen9 TM073 (Drain Punch) | 14 | 20,000 F | Broken TM Diskx1, Proteinx1 | – |
 Gen9 TM074 (Reflect) | 12 | 7,000 F |  Gen9 TM104x1, Twisted Spoonx1 | – |
 Gen9 TM075 (Light Screen) | 12 | 7,000 F |  Gen9 TM128x1, Twisted Spoonx1 | – |
 Gen9 TM077 (Waterfall) | 11 | 20,000 F | Broken TM Diskx1,  Gen9 TM208x1, Mystic Waterx1, Hard Stonex1, Fossilized Fishx1 | – |
 Gen9 TM078 (Dragon Claw) | 8 | 18,000 F | Broken TM Diskx1, Dragon Fangx1, Proteinx1 | – |
 Gen9 TM079 (Dazzling Gleam) | 18 | 35,000 F | Broken TM Diskx1, Fairy Featherx2 | – |
 Gen9 TM080 (Metronome) | 13 | 25,000 F | Broken TM Diskx1, Silk Scarfx2 | Aurelia rerun wins (5) |
 Gen9 TM084 (Stomping Tantrum) | 16 | 10,000 F |  Gen9 TM133x10 | Arturo rerun wins (5) |
| Gen9 TM084 (Stomping Tantrum) | 16 | 10,000 F |  Gen9 TM215x10 | Arturo rerun wins (5) |
 Gen9 TM085 (Rest) | 5 | 20,000 F | Broken TM Diskx1, Twisted Spoonx1 | Complete quest: Defeat Boss Mesprit on Mesprit Cavern |
 Gen9 TM090 (Spikes) | 8 | 7,000 F | Broken TM Diskx1,  Earth Platex3,  Gen9 TM005x10 | Complete quest: Defeat Bertha in Sinnoh's Elite 4 |
 Gen9 TM091 (Toxic Spikes) | 19 | 7,000 F | Broken TM Diskx1, Gen9 TM090x1,  Poison Barbx1 | – |
 Gen9 TM092 (Imprison) | 7 | 10,000 F | Broken TM Diskx1, Twisted Spoonx1 | – |
 Gen9 TM093 (Flash Cannon) | 13 | 25,000 F | Broken TM Diskx1, Iron Platex1, Metal Coatx1 | – |
 Gen9 TM095 (Leech Life) | 9 | 25,000 F | Broken TM Diskx1, Silver Powderx1 | – |
 Gen9 TM097 (Fly) | 18 | 35,000 F | Broken TM Diskx1,  One Time Air Balloonx2 | – |
 Gen9 TM098 (Skill Swap) | 10 | 15,000 F | Broken TM Diskx1, Twisted Spoonx2 | – |
 Gen9 TM100 (Dragon Dance) | 21 | 25,000 F | Broken TM Diskx1, Dragon Fangx1, HP Upx1, Stardustx1 | Complete quest: Defeat Cynthia in Sinnoh's Champion Room |
 Gen9 TM101 (Power Gem) | 17 | 35,000 F | Broken TM Diskx1, Stone Platex2 | – |
| Gen9 TM104 (Iron Defense) | 9 | 7,000 F | Broken TM Diskx1, Iron Platex1, Metal Coatx2 | – |
 Gen9 TM105 (X-Scissor) | 18 | 35,000 F | Broken TM Diskx1, Silver Powderx2 | – |
 Gen9 TM110 (Liquidation) | 12 | 20,000 F | Broken TM Diskx1, Gen9 TM077x1, Fossilized Fishx2, Splash Platex1 | – |
 Gen9 TM115 (Dragon Pulse) | 14 | 32,000 F | Broken TM Diskx1,  Dragon Scalex1,  Calciumx1, Stardustx1 | Complete quest: Defeat Boss Regidrago on Fennel Ruins |
 Gen9 TM118 (Heat Wave) | 17 | 25,000 F | Broken TM Diskx1,  Flame Platex1 | Complete quest: Defeat Boss Moltres on Victory Road 2F (Kanto) |
 Gen9 TM119 (Energy Ball) | 8 | 20,000 F | Broken TM Diskx1,  Leaf Stonex1 | – |
 Gen9 TM122 (Encore) | 12 | 25,000 F | Broken TM Diskx1, Silk Scarfx2 | – |
 Gen9 TM123 (Surf) | 13 | 20,000 F | Broken TM Diskx1, Gen9 TM011x1, Splash Platex5, Gen9 TM005x1, Fossilized Fishx1 | – |
 Gen9 TM124 (Ice Spinner) | 17 | 35,000 F | Broken TM Diskx1, Icicle Platex2 | – |
| Gen9 TM128 (Amnesia) | 7 | 7,000 F | Broken TM Diskx1, Twisted Spoonx1 | – |
 Gen9 TM130 (Helping Hand) | 12 | 35,000 F | Broken TM Diskx1, Silk Scarfx2,  Oval Stonex1 | – |
 Gen9 TM131 (Pollen Puff) | 6 | 20,000 F | Broken TM Diskx1, Silver Powderx1 | – |
 Gen9 TM132 (Baton Pass) | 18 | 35,000 F | Broken TM Diskx1, Silk Scarfx2, Oval Stonex1 | Aurelia rerun wins (10) |
| Gen9 TM133 (Earth Power) | 14 | – | Gen9 TM005x10 | – |
| Gen9 TM133 (Earth Power) | 14 | – |  Gen9 TM028x10 | – |
 Gen9 TM134 (Reversal) | 4 | 15,000 F | Broken TM Diskx1 | – |
 Gen9 TM136 (Electric Terrain) | 8 | 10,000 F | Broken TM Diskx1 | Elleak rerun wins (5) |
 Gen9 TM138 (Psychic Terrain) | 8 | 20,000 F | Broken TM Diskx1, Mind Platex1 | – |
 Gen9 TM142 (Hydro Pump) | 19 | 30,000 F | Broken TM Diskx1, Gen9 TM123x1, Mystic Waterx1, Fossilized Fishx2, Big Pearlx1 | – |
 Gen9 TM143 (Blizzard) | 14 | 20,000 F | Broken TM Diskx1, Icicle Platex5, Never-Melt Icex2, Gen9 TM034x1 | Complete quest: Defeat Boss Articuno on Seafoam Islands B4F |
 Gen9 TM144 (Fire Pledge) | 17 | 35,000 F | Broken TM Diskx1,  Fire Stonex2 | – |
 Gen9 TM145 (Water Pledge) | 15 | 25,000 F | Broken TM Diskx1, Gen9 TM050x1, Mystic Waterx1, Pearlx1 | – |
 Gen9 TM146 (Grass Pledge) | 13 | 25,000 F | Broken TM Diskx1, Leaf Stonex2 | – |
 Gen9 TM147 (Wild Charge) | 11 | 25,000 F | Broken TM Diskx1,  Thunder Stonex1 | – |
 Gen9 TM149 (Earthquake) | 20 | 15,000 F | Broken TM Diskx1,  Gen9 TM186x3 | – |
 Gen9 TM151 (Phantom Force) | 19 | 35,000 F | Broken TM Diskx1, Spell Tagx2 | – |
 Gen9 TM152 (Giga Impact) | 25 | 15,000 F | Broken TM Diskx1, Silk Scarfx1 | – |
 Gen9 TM153 (Blast Burn) | 23 | 35,000 F | Broken TM Diskx1,  Magmarizerx2 | – |
 Gen9 TM154 (Hydro Cannon) | 21 | 40,000 F | Broken TM Diskx1, Gen9 TM142x1, Gen9 TM145x1, Fossilized Fishx2, Damp Rockx1, Big Pearlx1 | – |
 Gen9 TM156 (Outrage) | 19 | 38,000 F | Broken TM Diskx1, Dragon Scalex1, Proteinx1, Star Piecex1 | Charil rerun wins (10) |
 Gen9 TM158 (Focus Blast) | 18 | 35,000 F | Broken TM Diskx1,  Black Beltx2 | – |
 Gen9 TM161 (Trick Room) | 10 | 45,000 F | Broken TM Diskx1, Mind Platex1, Twisted Spoonx1, Star Piecex1 | Complete quest: Defeat Boss Uxie on Uxie Cavern |
 Gen9 TM163 (Hyper Beam) | 25 | 15,000 F | Broken TM Diskx1, Silk Scarfx1 | – |
 Gen9 TM164 (Brave Bird) | 19 | 25,000 F | Broken TM Diskx1, Sharp Beakx1 | – |
 Gen9 TM165 (Flare Blitz) | 19 | 30,000 F | Broken TM Diskx1, Fire Stonex1, Charcoalx1, Magmarizerx1 | – |
 Gen9 TM166 (Thunder) | 20 | 20,000 F | Broken TM Diskx1, Thunder Stonex1 | Complete quest: Defeat Boss Zapdos on Route 10 Power Plant |
 Gen9 TM167 (Close Combat) | 19 | 45,000 F | Broken TM Diskx1, Black Beltx1, Muscle Bandx1, Proteinx1 | – |
 Gen9 TM170 (Steel Beam) | 19 | 35,000 F | Broken TM Diskx1, Iron Platex1, Metal Coatx1, Star Piecex1 | – |
 Gen9 TM171 (Tera Blast) | 24 | 35,000 F | Broken TM Diskx1, Silk Scarfx2, Oval Stonex1 | – |
 Gen9 TM174 (Haze) | 10 | 15,000 F | Broken TM Diskx1, Ice Stonex2 | Complete quest: Defeat Boss Regice on Frostvault Cavern |
 Gen9 TM175 (Toxic) | 21 | 50,000 F | Broken TM Diskx1, Poison Barbx2,  Black Sludgex1 | – |
 Gen9 TM176 (Sand Tomb) | 16 | 15,000 F | Broken TM Diskx1, Gen9 TM005x2 | Arturo rerun wins (10) |
 Gen9 TM178 (Gravity) | 7 | 10,000 F | Broken TM Diskx1 | – |
 Gen9 TM179 (Smack Down) | 3 | 20,000 F | Broken TM Diskx1, Stone Platex1 | Ghadafi rerun wins (10) |
 Gen9 TM182 (Bug Bite) | 2 | 10,000 F | Broken TM Diskx1 | – |
 Gen9 TM185 (Lunge) | 11 | 25,000 F | Broken TM Diskx1, Silver Powderx2 | – |
| Gen9 TM186 (High Horsepower) | 18 | 10,000 F | Broken TM Diskx1, Gen9 TM084x3 | – |
 Gen9 TM188 (Scald) | 20 | 10,000 F | Broken TM Diskx1, Gen9 TM050x1, Splash Platex1, Charcoalx1, Mystic Waterx1 | – |
 Gen9 TM189 (Heat Crash) | 22 | 35,000 F | Broken TM Diskx1, Fire Stonex2 | Complete quest: Defeat Flint in Sinnoh's Elite 4 |
 Gen9 TM192 (Focus Punch) | 17 | 25,000 F | Broken TM Diskx1, Black Beltx1, Muscle Bandx1 | – |
 Gen9 TM193 (Weather Ball) | 20 | 35,000 F | Broken TM Diskx1, Silk Scarfx1, Oval Stonex2 | – |
 Gen9 TM195 (Burning Jealousy) | 11 | 25,000 F | Broken TM Diskx1, Flame Platex1 | Blitz rerun wins (5) |
 Gen9 TM196 (Flip Turn) | 17 | 25,000 F | Broken TM Diskx1, Gen9 TM077x1, Mystic Waterx1, Splash Platex5, Gen9 TM005x1 | – |
 Gen9 TM200 (Scale Shot) | 16 | 32,000 F | Broken TM Diskx1, Dragon Scalex1, Proteinx1, Stardustx1 | Charil rerun wins (5) |
 Gen9 TM203 (Psych Up) | 10 | 15,000 F | Broken TM Diskx1, Silk Scarfx1 | – |
 Gen9 TM206 (Petal Blizzard) | 11 | 15,000 F | Broken TM Diskx1, Leaf Stonex1 | – |
| Gen9 TM208 (Whirlpool) | 3 | 5,000 F | Broken TM Diskx1, Splash Platex1, Mystic Waterx1, Fossilized Fishx1 | – |
 Gen9 TM209 (Muddy Water) | 6 | 10,000 F | Broken TM Diskx1, Gen9 TM022x1, Smooth Rockx1, Gen9 TM005x1 | Izumi rerun wins (10) |
 Gen9 TM211 (Electroweb) | 6 | 10,000 F | Broken TM Diskx1, Magnetx1 | – |
 Gen9 TM213 (Coaching) | 6 | 15,000 F | Broken TM Diskx1, Muscle Bandx1 | – |
 Gen9 TM216 (Feather Dance) | 11 | 25,000 F | Broken TM Diskx1, One Time Air Balloonx1 | – |
 Gen9 TM218 (Expanding Force) | 24 | 35,000 F | Broken TM Diskx1, Mind Platex2 | Complete quest: Defeat Lucian in Sinnoh's Elite 4 |
 Gen9 TM219 (Skitter Smack) | 4 | 20,000 F | Broken TM Diskx1, Silver Powderx1 | – |
 Gen9 TM220 (Meteor Beam) | 21 | 35,000 F | Broken TM Diskx1, Hard Stonex2 | Complete quest: Defeat Boss Regirock on Stonegrip Cavern |
 Gen9 TM222 (Breaking Swipe) | 5 | 15,000 F | Broken TM Diskx1, Dragon Fangx1, HP Upx1 | – |
 Gen9 TM223 (Metal Sound) | 2 | 10,000 F | Broken TM Diskx1, Metal Coatx1 | – |
 Gen9 TM225 (Hard Press) | 7 | 20,000 F | Broken TM Diskx1, Iron Platex1 | – |
 Gen9 TM226 (Dragon Cheer) | 3 | 7,000 F | Broken TM Diskx1, Dragon Fangx1, Heart Scalex1 | – |